tweeeetyのぶろぐ的めも

アウトプットが少なかったダメな自分をアウトプット<br>\(^o^)/

【mongodb】Mac OSにmongodbをinstallするメモ

はじめに

久しぶりにMongoDBを触ろうと思いおもむろに
brew install mongodb
としたらエラー。

どうやらHomebrew Coreから消えたようです。
ということでinstallメモ

アジェンダ

  1. どんなエラーか
  2. brew tapからinstallする
  3. brew tapからinstall時のエラー

1. どんなエラーか

brew install だと以下のようなエラーが出ます。

$ brew install mongodb
Updating Homebrew...
Error: No available formula with the name "mongodb"
==> Searching for a previously deleted formula (in the last month)...
Warning: homebrew/core is shallow clone. To get complete history run:
  git -C "$(brew --repo homebrew/core)" fetch --unshallow

Error: No previously deleted formula found.
==> Searching for similarly named formulae...
Error: No similarly named formulae found.
==> Searching taps...
==> Searching taps on GitHub...
Error: No formulae found in taps.

2. brew tapからinstallする

改めて公式を見返すと、installや使い方などはちゃんと記載がありました。

brew tapにて公式以外のリポジトリをフォーミュラとしてHomebrewに追加してからinstallを行います。

# tapをする
$ brew tap mongodb/brew
Updating Homebrew...
==> Tapping mongodb/brew
Cloning into '/usr/local/Homebrew/Library/Taps/mongodb/homebrew-brew'...

# installを行う
$ brew install mongodb-community
Updating Homebrew...

-- 省略  

To have launchd start mongodb/brew/mongodb-community now and restart at login:
  brew services start mongodb/brew/mongodb-community
Or, if you don't want/need a background service you can just run:
  mongod --config /usr/local/etc/mongod.conf
==> Summary
🍺  /usr/local/Cellar/mongodb-community/4.4.0: 11 files, 136.7MB, built in 2 seconds
==> Caveats
==> mongodb-community
To have launchd start mongodb/brew/mongodb-community now and restart at login:
  brew services start mongodb/brew/mongodb-community
Or, if you don't want/need a background service you can just run:
  mongod --config /usr/local/etc/mongod.conf

3. brew tapからinstall時のエラー

brew install mongodb-communityでエラーが出る場合

brew install mongodb-communityで以下のようにエラーが出る場合、すなおにbrew install gccを行いましょう。

# mongodb-communityでインストール
$ brew install mongodb-community
Updating Homebrew...
==> Installing mongodb-community from mongodb/brew
==> Downloading https://fastdl.mongodb.org/tools/db/mongodb-database-tools-macos-x86_64-100.1.1.zip
######################################################################## 100.0%
==> Downloading https://fastdl.mongodb.org/osx/mongodb-macos-x86_64-4.4.0.tgz
######################################################################## 100.0%
==> Installing dependencies for mongodb/brew/mongodb-community: mongodb-database-tools
==> Installing mongodb/brew/mongodb-community dependency: mongodb-database-tools
xcrun: error: invalid active developer path (/Library/Developer/CommandLineTools), missing xcrun at: /Library/Developer/CommandLineTools/usr/bin/xcrun
Error: An exception occurred within a child process:
  CompilerSelectionError: mongodb/brew/mongodb-database-tools cannot be built with any available compilers.
Install GNU's GCC:
  brew install gcc`

brew install gccでエラーが出る場合

brew install gccで以下のようにエラーが出る場合、Command Line Toolsをインストール or インストールしなおす必要があるようです。

ぼくはinstallしていたのですがエラーが出たのでinstallしなおしました。
installはxcode-select --installで行います。

# gccをインストール
$ brew install gcc
Updating Homebrew...
==> Downloading https://homebrew.bintray.com/bottles/gmp-6.2.0.catalina.bottle.tar.gz
==> Downloading from https://d29vzk4ow07wi7.cloudfront.net/2e6acd6e62d1b8ef0800061e113aea30a63f56b32b99c010234c0420fd6d3ecf?response-content-disposition=attachment%3Bfilename%3D%22gmp-6.2.0.catalin
######################################################################## 100.0%
==> Downloading https://homebrew.bintray.com/bottles/isl-0.22.1.catalina.bottle.tar.gz
==> Downloading from https://d29vzk4ow07wi7.cloudfront.net/b5319e3bbbb36ef3536d841999b7497b3dce4bf9e07fb04f6b0db716e087896d?response-content-disposition=attachment%3Bfilename%3D%22isl-0.22.1.catali
######################################################################## 100.0%
==> Downloading https://homebrew.bintray.com/bottles/mpfr-4.1.0.catalina.bottle.tar.gz
==> Downloading from https://d29vzk4ow07wi7.cloudfront.net/5fcf57834f58c18761c6c7b0eb961eb7f9fc54325b5361bf3a17c4dee6ebc08a?response-content-disposition=attachment%3Bfilename%3D%22mpfr-4.1.0.catali
######################################################################## 100.0%
==> Downloading https://homebrew.bintray.com/bottles/libmpc-1.2.0.catalina.bottle.tar.gz
######################################################################## 100.0%
Warning: Building gcc from source:
  The bottle needs the Xcode CLT to be installed.
==> Downloading https://ftp.gnu.org/gnu/gcc/gcc-10.2.0/gcc-10.2.0.tar.xz
######################################################################## 100.0%
Error: The following formula
  gcc
cannot be installed as binary package and must be built from source.
Install the Command Line Tools:
  xcode-select --install

インストールしなおした一連

Command Line Toolsはわりと時間がかかります。
15 ~ 30minほどみておくと良いでしょう。

# Command Line Toolsをインストール
$ xcode-select --install
xcode-select: note: install requested for command line developer tools

# gccをインストール
$ brew install gcc

# mmongodbをtapする
$ brew tap mongodb/brew

# mongodb-communityをインストール
$ brew install mongodb-community

4. mongodの起動

mongoの起動は、configファイルを指定してbackground processで起動します。
configファイルを見ればわかりますが、dbファイルは/usr/local/var/mongodbにあります。

# バックグラウンドで起動する
$ mongod --config /usr/local/etc/mongod.conf --fork

# 起動を確認
$ ps aux | grep mongo
tweeeety  5730   0.2  0.1  5531164  22884   ??  S     3:54AM   0:00.68 mongod --config /usr/local/etc/mongod.conf --fork
tweeeety  5744   0.0  0.0  4278540    724 s009  S+    3:54AM   0:00.00 grep mongo

# confを確認
$ cat /usr/local/etc/mongod.conf
systemLog:
  destination: file
  path: /usr/local/var/log/mongodb/mongo.log
  logAppend: true
storage:
  dbPath: /usr/local/var/mongodb
net:
  bindIp: 127.0.0.1

終わり

数年前はどうしてたっけ?と自分のブログを見返してみました。
ソースからinstallしてたので、まあ時代は変わるよなーと思いました。

【github】二段階認証後にprivate repositoryのgit cloneで失敗するときの対応メモ

はじめに

しばらくManagementや組織開発を行っていました。
久しぶりに開発環境を作る必要がありcloneから…と思ったらいきなりコケたのでそのメモです。

条件は以下:

  • 個人のgit設定は問題がない
  • Private Organization
  • Private Repository
  • 二段階認証済み

アジェンダ

  1. エラーの状態と原因
  2. How to

1. エラーの状態と原因

エラーはこんな感じ

$ git clone git@github.com:yyyy/xxxx.git
Cloning into 'xxxx'...
ERROR: The 'yyyy' organization has enabled or enforced SAML SSO. To access
this repository, you must use the HTTPS remote with a personal access token
or SSH with an SSH key and passphrase
that has been whitelisted for this organization. Visit
https://docs.github.com/articles/authenticating-to-a-github-organization-with-saml-single-sign-on/ for more information.

fatal: Could not read from remote repository.

Please make sure you have the correct access rights
and the repository exists.

原因は、ERRORに記載のある通りですが訳を載せておきます。

The 'yyyy' organization has enabled or enforced SAML SSO. To access this repository, you must use the HTTPS remote with a personal access token or SSH with an SSH key and passphrase that has been whitelisted for this organization.
 
'yyyy'組織はSAML SSOを有効化または適用しています。このリポジトリにアクセスするには、個人用アクセストークンでHTTPSリモートを使用する必要があります。 または、この組織のホワイトリストに登録されているSSHキーとパスフレーズを使用してSSHを実行します。

2. How to

大まかに以下の順で設定を行います。

  • tokenを設定
  • tokenを保存
  • SSO連携を行いAuthorizeする
  • https x tokenでgit cloneを行う

tokenを設定

tokenを設定するために、 githubにログインして以下の順に開きます。

  • Settings
  • 左サイドバー > Developer settings
  • 左サイドバー > Personal access tokens
  • Generate new tokenボタン

以下の画面を開き、
Generate new tokenボタンからtokenの設定を行います。 f:id:tweeeety:20200818035049p:plain

次の画面にて以下を行います。

  • Personal Tokenに対するNoteに任意の文字列を入力
  • Select scopes(チェックボックス)をすべてチェック
  • Generate tokenボタンでtoken作成

f:id:tweeeety:20200818035037p:plain

tokenを保存

tokenが生成されると、次の画面が表示されます。
緑背景の部分がtokenですが、一度しか表示されないのでコピペするなりして保存します。

f:id:tweeeety:20200818035025p:plain

SSO連携を行いAuthorizeする

Enable SSOのプルダウンを選択します。
SSOが必要なorganizationsが表示されているのでAuthorizeを行います。

f:id:tweeeety:20200818035012p:plain

https x tokenでgit cloneを行う

ターミナルに戻りhttpsでgit cloneします。

UsernameとPasswordを聞かれるので、Passwordに保存したtokenを利用して認証します。

$ git clone https://github.com/yyyy/xxxx.git
Cloning into 'xxxx'...
Username for 'https://github.com':
Password for 'https://tweeeety@github.com':
remote: Enumerating objects: 158, done.
remote: Counting objects: 100% (158/158), done.
remote: Compressing objects: 100% (136/136), done.
remote: Total 7465 (delta 75), reused 82 (delta 22), pack-reused 7307
Receiving objects: 100% (7465/7465), 1.24 MiB | 1.41 MiB/s, done.
Resolving deltas: 100% (3699/3699), done.

終わり

git cloneみたいな最初でコケると「アレ、だいぶ忘れてるな…」と思いますねー。

【node】npmパッケージ nodemonを使ってみるメモ

はじめに

Node.jsの開発時、ソースコードの修正のたびに手動でctrl + c/d -> node main.jsしていると思います。
この一連の監視と再起動を自動で行ってくれるパッケージnodemonを使うメモです。

アジェンダ

  1. nodemonとは
  2. nodemonのインストール
  3. nodemonの実行方法

1. nodemonとは

はじめにでも触れましたが、
nodemonとは、ソースコードの変更を監視し、自動的にnodeコマンドを再起動してくれるnpmパッケージです。

詳細は本家をご確認ください。

2. nodemonのインストール

nodemonのインストールは2通りあります。

2.1. グローバルにインストールする(dependency)
2.2. 開発用だけにインストールする(devDependency)

2.1. グローバルにインストールする(dependency)

$ npm install -g nodemon

2.2. 開発用だけにインストールする(devDependency)

$ npm install --save-dev nodemon

3. nodemonの実行方法

利用もいくつか方法があります。

3.1. グローバルインストールした場合
3.2. 開発用だけにインストールした場合

3.1. グローバルインストールした場合

グローバルにインストールすると、PATHが通るのでコマンドがそのまま使えます。

$ nodemon main.js

3.2. 開発用だけにインストールした場合

開発用にだけインストールした場合、PATHが通っていません。
そのため、実行方法は大きく3通りあります。

  • package.jsonのscriptsを通して実行
  • npx経由で実行
  • 手動実行
package.jsonのscriptsを通して実行

一般的な実行方法です。
package.jsonのscriptsは後述する手動実行をかわりに行ってくれます。

# "start"行を追加
$ vim package.json
-- vim --
  "scripts": {
    "start": "nodemon main.js",
    "test": "echo \"Error: no test specified\" && exit 1"
   }
---------

# 実行
$ node start
npx経由で実行

npmにはnpxというコマンドが同梱されています。
npxを使うと、ローカルにインストールしたnpmパッケージを、npxコマンドだけで実行できるようになります。

$ npx nodemon main.js
手動実行

nodemonの実態は./node_modules/nodemon/bin/nodemon.jsにあります。
また、npmインストールを行うと実行用のファイルも別途生成されています。

# 実態ファイルの確認
$ ls -l ./node_modules/nodemon/bin/nodemon.js
-rwxr-xr-x  1 tweeeety  tweeeety  438 10 26  1985 ./node_modules/nodemon/bin/nodemon.js

$ 実行ファイルの確認
$ ls -l ./node_modules/.bin/nodemon
lrwxr-xr-x  1 tweeeety  tweeeety  25  6 13 03:35 ./node_modules/.bin/nodemon -> ../nodemon/bin/nodemon.js

つまり、実行用ファイルを通して実行する場合は以下のように行います。

$ ./node_modules/.bin/nodemon main.js

参照

終わり

nodemon便利\(^o^)/

【Mac】`Warning: Failed to set locale category LC_XX to en_JP.`というエラー(Warning)が出るとき

はじめに

英語勉強のため、
少しでも英語に触れようとmacの言語設定を英語に変更しました。

そこから、vimを開くと以下のようなエラーが出るようになったので対応メモです。

Warning: Failed to set locale category LC_NUMERIC to en_JP.

目次

  1. なにをしたか
  2. どんなエラーか
  3. どう対応したか
  4. ロケールとは
  5. LANG環境変数
  6. locale

1. なにをしたか

macの言語設定を日本語->英語に変更しました。

以下の順で設定を開きます。

システム環境設定 > 言語と地域

f:id:tweeeety:20200321055410p:plain

希望の言語を「優先する言語」リストの先頭にドラッグします

f:id:tweeeety:20200321055426p:plain

これで再起動後、PCのデフォルト言語が英語に切り替わります。

2. どんなエラーか

GUIで使っている分には特に何も起きていませんでした。

しかし、vimを開こうとすると以下のようなエラーが出るようになりました。

$ vim
Warning: Failed to set locale category LC_NUMERIC to en_JP.
Warning: Failed to set locale category LC_TIME to en_JP.
Warning: Failed to set locale category LC_COLLATE to en_JP.
Warning: Failed to set locale category LC_MONETARY to en_JP.
Warning: Failed to set locale category LC_MESSAGES to en_JP.

エラーと記載してますが、Warningなので気にしなければそのままvimは動作します。 しかし、毎回出るので直したくなります。

3. どう対応したか

対応は簡単で、~/.bash_profileに環境変数LANGを設定するだけです。

# 設定前のlocale確認
# おそらく英語に変えた事で変わってしまったと思われる
$ locale
LANG=
LC_COLLATE="C"
LC_CTYPE="UTF-8"
LC_MESSAGES="C"
LC_MONETARY="C"
LC_NUMERIC="C"
LC_TIME="C"
LC_ALL=

$ vim ~/.bash_profile
-- vi編集 --
export LANG=ja_JP.UTF-8
------------

# 設定後のlocale確認
$ locale
LANG="ja_JP.UTF-8"
LC_COLLATE="ja_JP.UTF-8"
LC_CTYPE="UTF-8"
LC_MESSAGES="ja_JP.UTF-8"
LC_MONETARY="ja_JP.UTF-8"
LC_NUMERIC="ja_JP.UTF-8"
LC_TIME="ja_JP.UTF-8"
LC_ALL=

4. ロケールとは

各言語などの地域情報を「ロケール」と呼びます。
日本の場合現在では「ja_JP.UTF-8」という文字コードです。

このja_JP.UTF-8が何を表しているかというと以下のフォーマットになっています。

言語_国.文字コード

5. LANG環境変数

上記のja_JP.UTF-8ですが、LANG環境変数に設定します。

LANG系の環境変数は、
2. どんなエラーかにも記載したとおりいくつかあります。

LANGLC_ALLは特殊なものとなっています。
LC_ALLが設定された場合は、全てのローカライゼーション系環境変数は必ずその値が使用されます。
LANGの場合は、LC_TIMEなどを個別に設定して上書きが可能です。

6. locale

localeコマンドは現在のロケールを一覧表示します。
locale -aで利用可能なロケール名を表示します。

参考サイト

おわりに

PCを英語に変えたので英語学習に向けて頑張ります\(^o^)/

【書籍】ソフトウェア 開発者 採用ガイド - を読んだメモ

はじめに

「ソフトウェア 開発者 採用ガイド(Joel on Hiring)」
という書籍の自分まとめへの引用です。

ソフトウェア開発者採用ガイド
Joel Spolsky
翔泳社
売り上げランキング: 389,465

詳細

詳細は以下のnoteに記載しています。

【JIRA】Jira Cloudでslackを連携させるメモ

はじめに

JIRAとSlackを連携させて、Jiraをより便利に使おうというメモです

アジェンダ

  1. Jira Cloud for Slackとは
  2. Jira - Slack integrationのながれ
  3. SlackにJira Cloudアプリを追加する
  4. Jiraにてintegrationを作成する
  5. Jiraにてintegration設定する
  6. Jiraでticket発行してみる

1. Jira Cloud for Slackとは

まんまではありますが、Jiratとslackの連携をするアプリです。

なにができるか

以下のようなことができます

  • Jiraでのissueオペレーション
    • ticket発行・更新時にslackに通知する
    • assignee追加・更新時にslackに通知する
  • Slackでのオペレーション
    • slash commandsでチケットを発行する
    • slack上でassigneeを変更する

どこにあるか

それぞれの場所を確認してみます

jira

jiraではprojectごとにintegrationを設定します。
projectページのProject settingsから設定を開きます
f:id:tweeeety:20191107184753p:plain

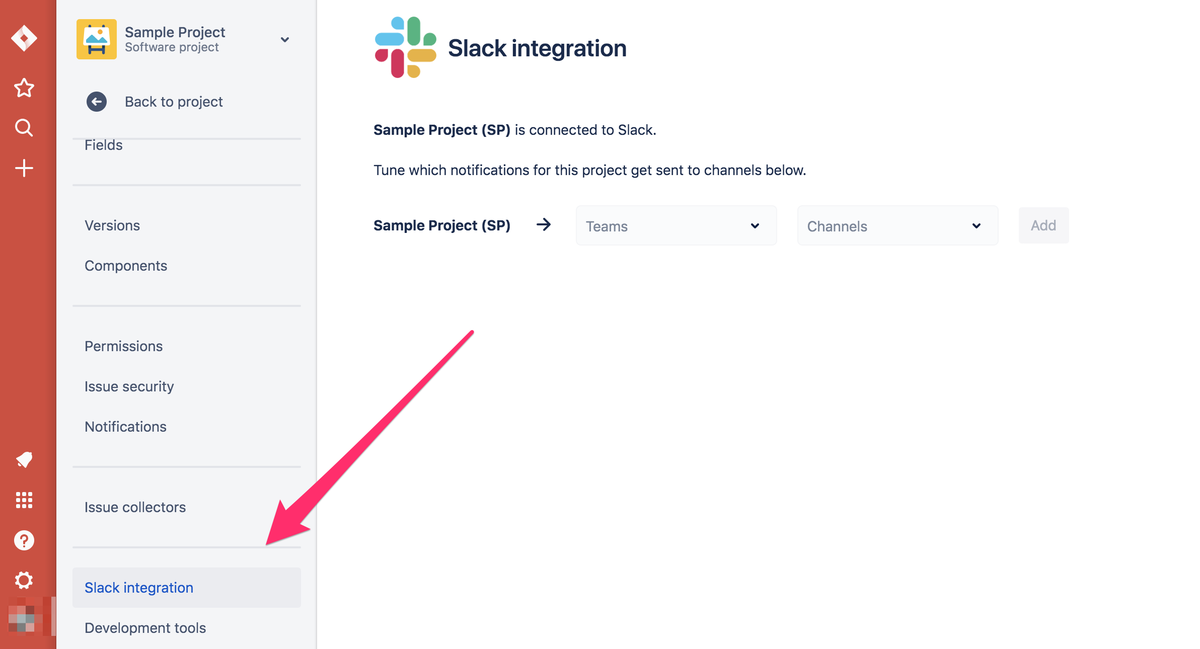
設定ページで左サイドバーの下のほうにあるSlack integrationを開きます f:id:tweeeety:20191107184837p:plain

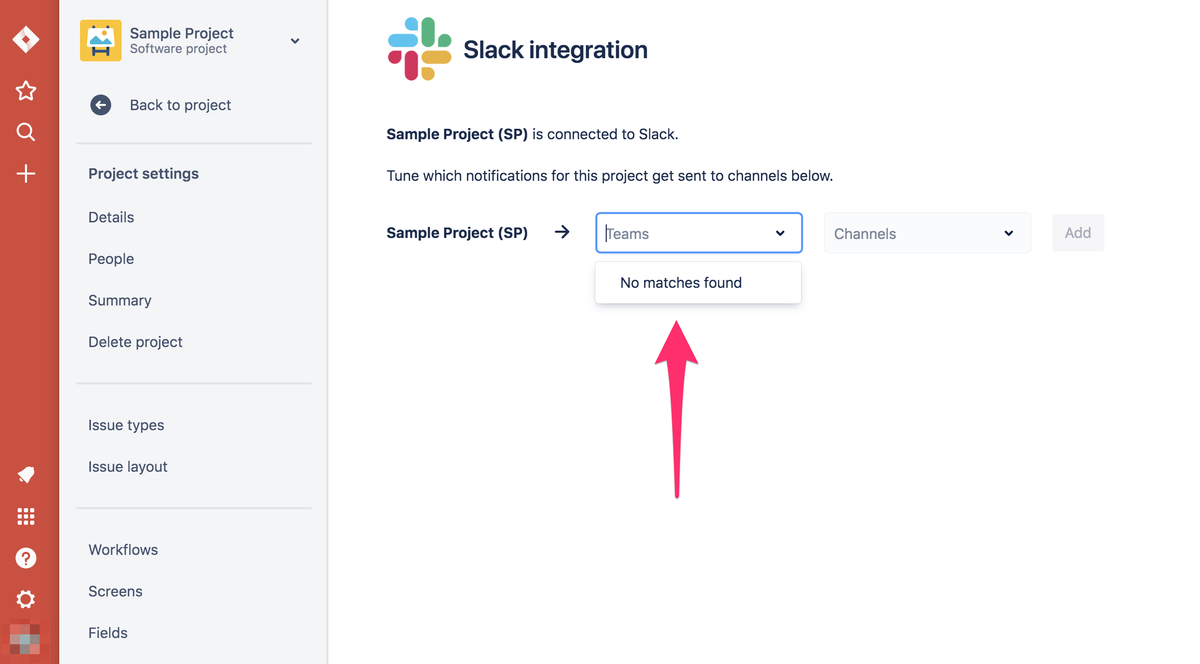
このページで設定しますが、
SlackとのConnectionをしないとそもそも選ぶものもなく、
Addができません f:id:tweeeety:20191107184854p:plain

slack

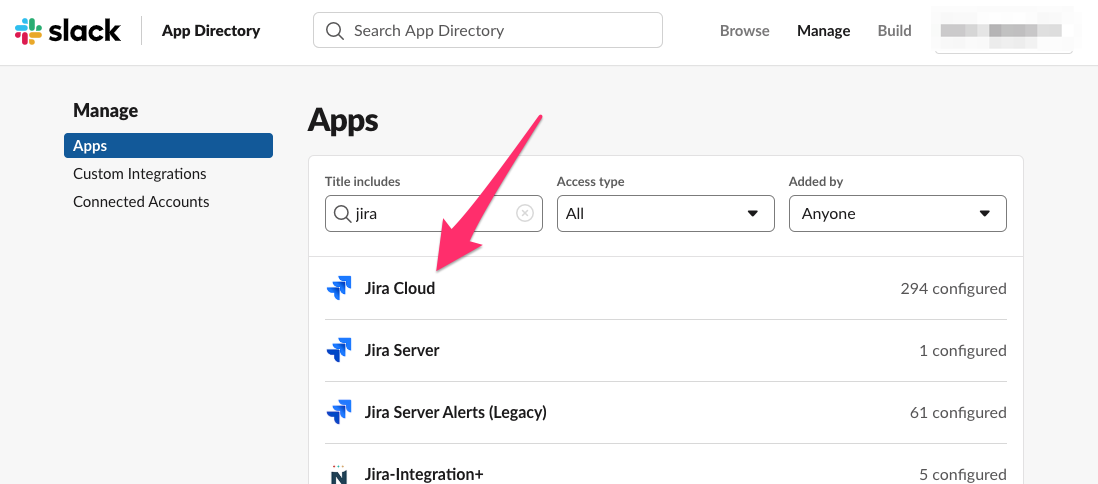
workspaceにwebでアクセスしConfigure appsを開きます。
appsの検索でjiraと打てばjira cloudが出てきます。
f:id:tweeeety:20191107184915p:plain

2. Jira - Slack integrationのながれ

integrationの設定を行います。
公式サイトにも記載してますのでご参考ください
* Jira Cloud for Slack

integrationの流れは主に以下の流れで行います

  • SlackにJira Cloudアプリを追加する
  • Jiraにてintegrationを作成する
  • Jiraにてintegration設定する

3. SlackにJira Cloudアプリを追加する

公式にも記載のある以下のを開きます

https://jira-slack-integration.prod.atl-paas.net/api/slack/login

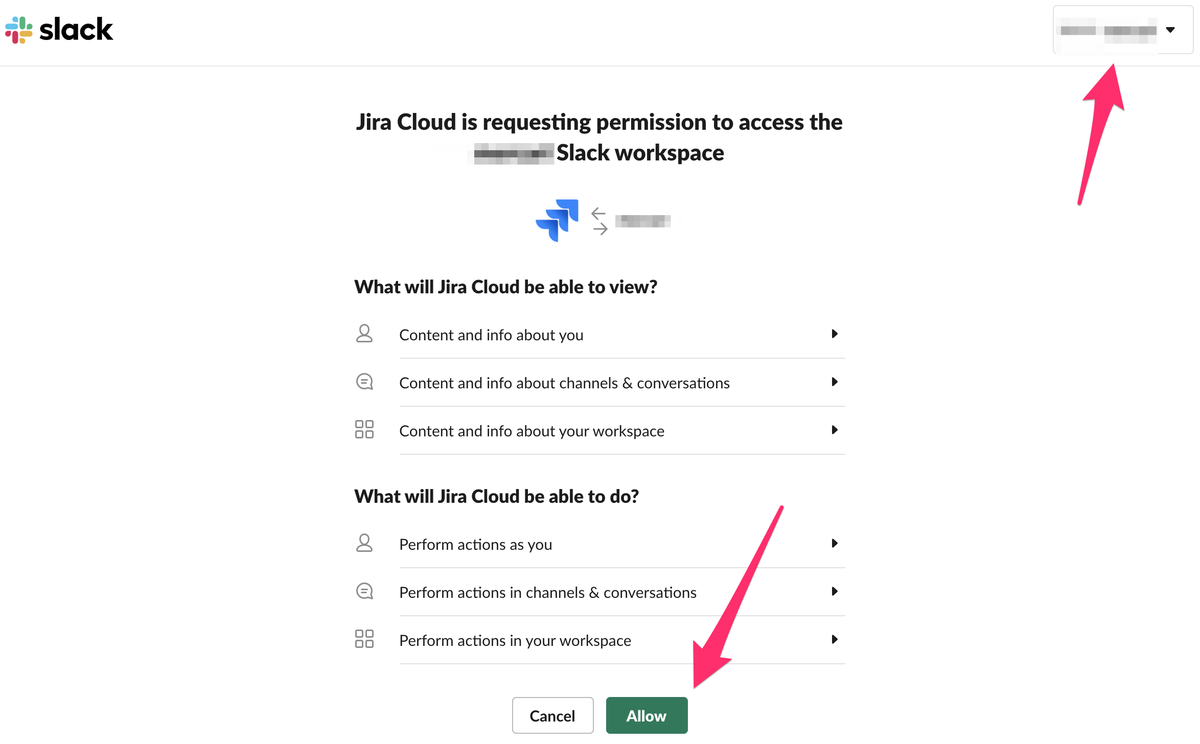
利用想定のworkspaceが選択された状態を確認し、Allowを押します。
f:id:tweeeety:20191107184953p:plain

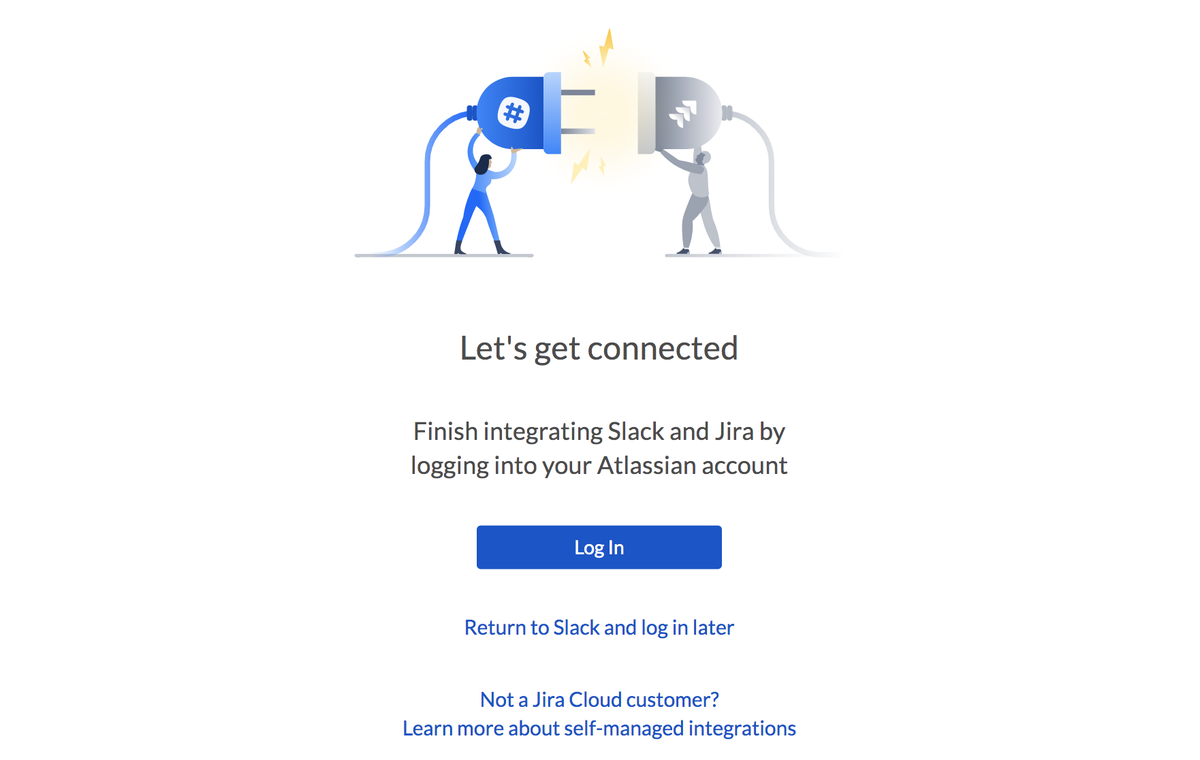
Log inを押します f:id:tweeeety:20191107185012p:plain

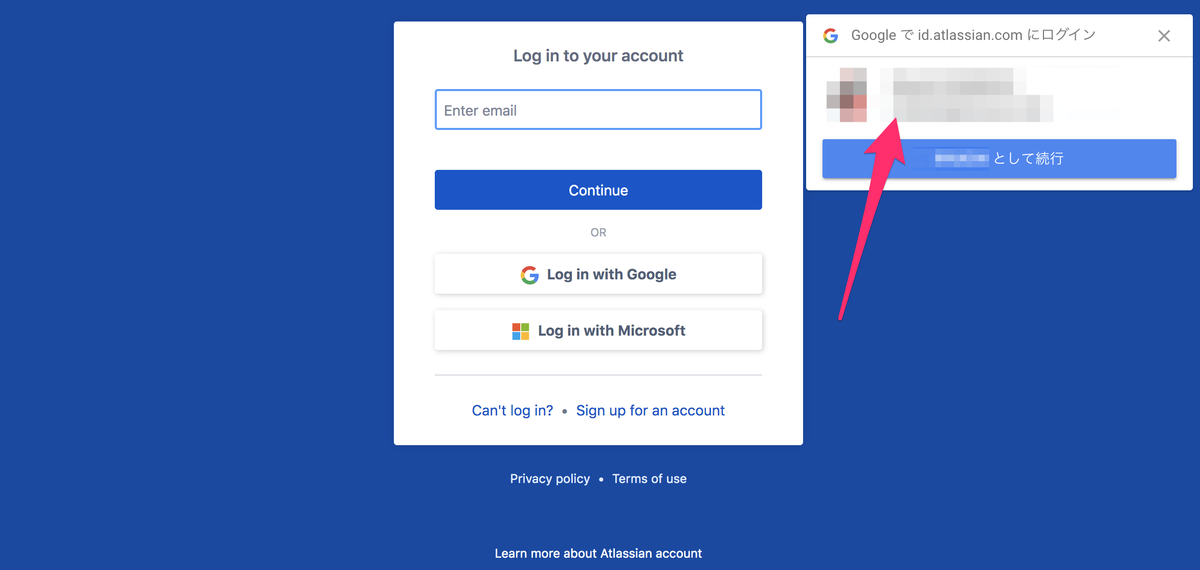
G Suiteなどを利用していればSNS 認証でログインしてください f:id:tweeeety:20191107185026p:plain

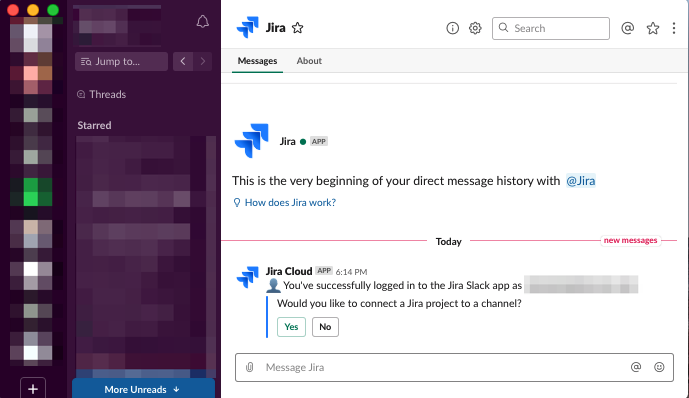
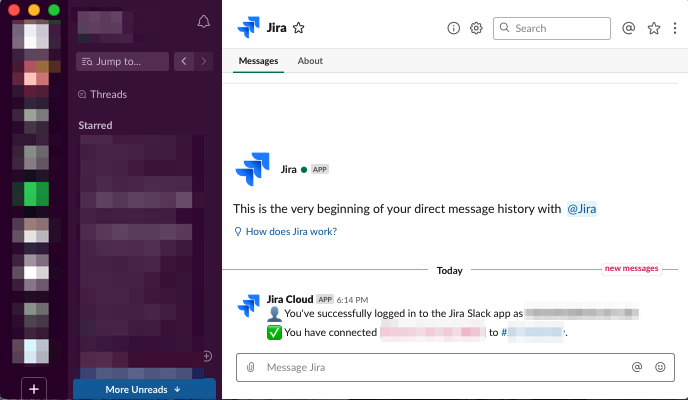
ログインが成功するとslackに通知が来ます f:id:tweeeety:20191107185040p:plain

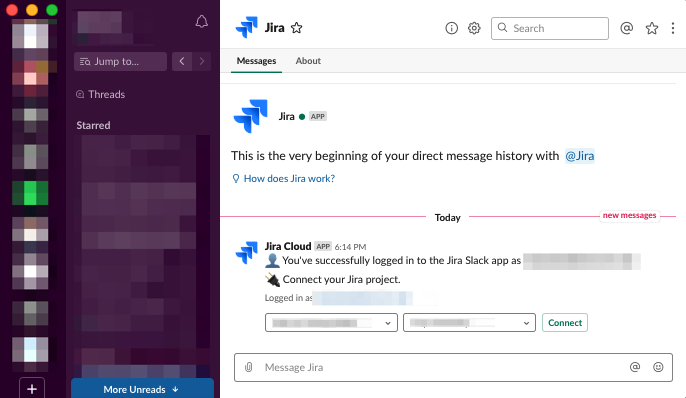
Dialogは左: jiraのProject右: slackのchannelとなっています。
選択してconnectを押します。
f:id:tweeeety:20191107185106p:plain

これにて成功です!! f:id:tweeeety:20191107185118p:plain

4. Jiraにてintegrationを作成する

Projectページ > Project settings > Slack integration を開きます。

今度はTeamsにslackのworkspaceが選択できるようになっています。
f:id:tweeeety:20191107185134p:plain

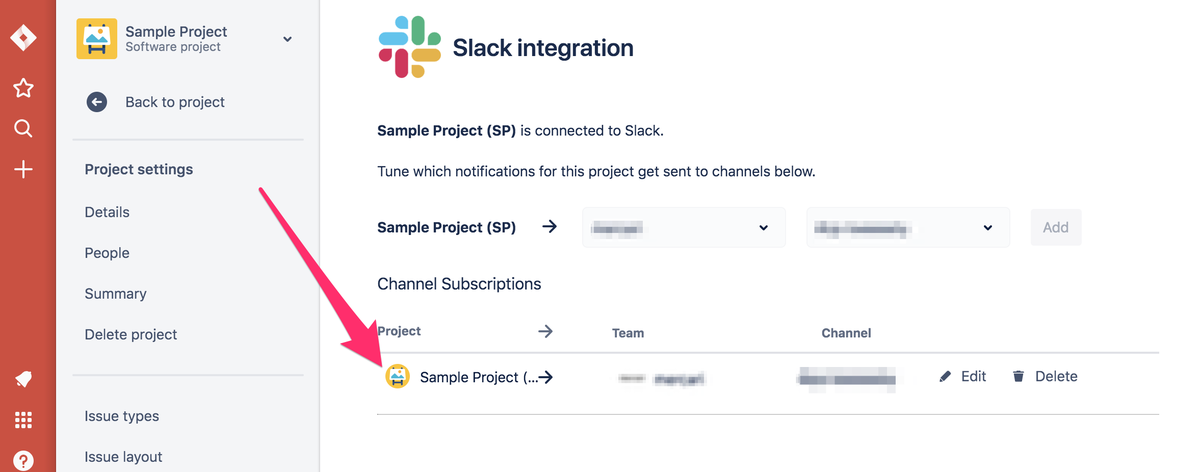
workspaceとchannelを選択してaddするとChannel Subscriptionsにintegrationが追加されます。 f:id:tweeeety:20191107185203p:plain

5. Jiraにてintegration設定する

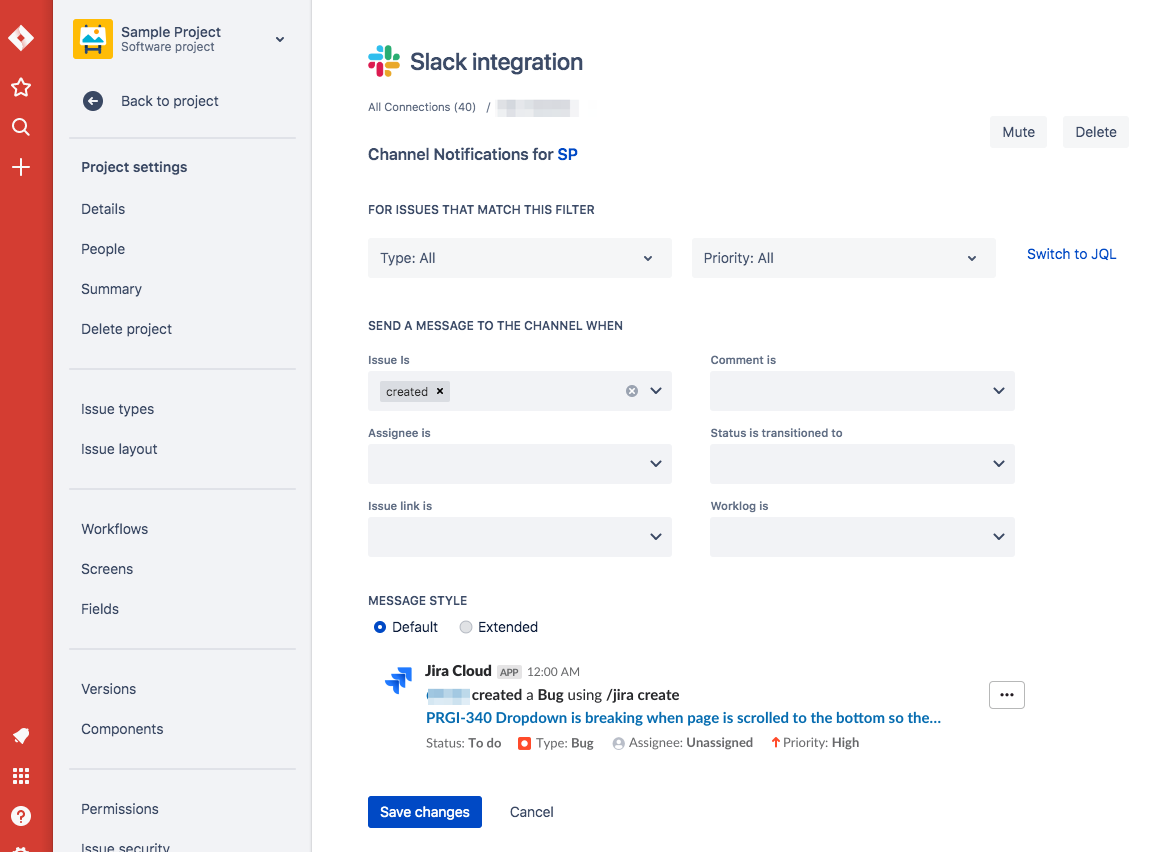
Channel SubscriptionsのEditから細かい設定が行えます。
f:id:tweeeety:20191107185218p:plain

6. Jiraでticket発行してみる

Jiraでticketを発行すると設定したchannleに以下のように投稿されます f:id:tweeeety:20191107185230p:plain

また、Slack上の からAssignを変更したりも可能です f:id:tweeeety:20191107185238p:plain

おわり

Jiraとslackの連携は昔はもっと大変なイメージがありました。

いまはとても簡単になってます!\(^o^)/

【git】submodule updateでfailed & 毎回パスワード聞かれる問題

はじめに

とあるrepositoryにsubmoduleを複数使っていて、
git submodule updateをしたかったのですが
以下の2つで困ったのでメモ

  • 毎回パスワードを聞かれる
  • ID/pass入力でfatal: Authentication failedしてしまう

アジェンダ

  1. 起こったこと
  2. 対応したこと

1. 起こったこと

冒頭に記載したまんまですが、

  • 毎回パスワードを聞かれる
  • ID/pass入力でfatal: Authentication failedしてしまう

が起こっていました。

このときの状態

このときの状態は以下のようになっていました。

$ vim .gitmodules
-- vi --
[submodule "template/a"]
  path = template/a
  url = https://github.com/hoge/template-a.git
[submodule "template/b"]
  path = template/b
  url = https://github.com/hoge/template-b.git
[submodule "template/c"]
  path = template/c
  url = https://github.com/hoge/template-c.git
--------

実行したとき

3回ID/passが聞かれた上にfailedしました。

$ git submodule update
Cloning into '/Users/tweeeety/github/any-repos/template/a'...
Username for 'https://github.com': tweeeety
Password for 'https://tweeeety@github.com':
remote: Invalid username or password.
fatal: Authentication failed for 'https://github.com/hoge/template-a.git/'
fatal: clone of 'https://github.com/hoge/template-a.git' into submodule path '/users/tweeeety/github/mercari/any-repos/template/a' failed
failed to clone 'template/a'. Retry scheduled
Cloning into '/Users/tweeeety/github/mercari/any-repos/template/a'...

~ 省略 ~

2. 対応したこと

対応としては.gitmodulesのurl指定をhttps指定からssh指定に変えました。

こんな感じですね

$ git diff .gitmodules

--- a/.gitmodules
+++ b/.gitmodules

 [submodule "template/a"]
        path = template/a
-       url = https://github.com/hoge/template-a.git
+       url = git@github.com:hoge/template-a.git
 [submodule "template/b"]
        path = template/b
-       url = https://github.com/hoge/template-b.git
+       url = git@github.com:hoge/template-b.git
 [submodule "template/c"]
        path = template/c
-       url = https://github.com/hoge/template-c.git
+       url = git@github.com:hoge/template-c.git

.git/config 内のsubmoduleの向き先は
この時点では変わらないので以下を実行します

$ git submodule sync

で、実行してみるとうまくいきましたとさ

$ git submodule update
Cloning into '/Users/tweeeety/github/any-repos/template/a'...
Cloning into '/Users/tweeeety/github/any-repos/template/b'...
Cloning into '/Users/tweeeety/github/any-repos/template/c'...
Submodule path 'template/a': checked out 'xxxxxxxxxxae935311265746382d1b54b4e2ab0f'
Submodule path 'template/b': checked out 'xxxxxxxxxx2b91a43b8a318f491348aa62b5306f'
Submodule path 'template/c': checked out 'xxxxxxxxxxa378276a71869ef3a63cdb3bb7b2c9'

おわり

httpsだとなんでダメなんや...
というところはあやふやにしてしまいましたが、
一旦次行きたいのでメモのみで!!\(^o^)/