tweeeetyのぶろぐ的めも

アウトプットが少なかったダメな自分をアウトプット<br>\(^o^)/

【gulp】run-sequenceでtaskを並列/直列(同期的)にする挙動を確認する

はじめに

gulpは長い事つかってますが、 フロントの方が入れてくれた環境を基に使っているのでゼロから学んだ経験は乏しいです。 (自分はサーバサイド)

ディレクトリのclearやbuildを行うためにrun-sequenceを使っています。

ふとした動機でこれの挙動をちゃんと確認したくなったので
そんなときの自分メモ

f:id:tweeeety:20180531172527p:plain

アジェンダ

  1. run-sequenceとは
  2. run-sequenceの使い方
  3. run-sequenceのrunSequenceで直列指定の挙動を確認

1. run-sequenceとは

説明は公式からの引用です

Runs a sequence of gulp tasks in the specified order.
This function is designed to solve the situation where you have defined run-order,
but choose not to or cannot use dependencies.
 
https://www.npmjs.com/package/run-sequence

指定された順序で一連のタスクを実行する君ということですね。

gulp4.0

公式サイトからの引用です。

これは、同様にタスクの依存関係を定義するためのサポートを持つ必要がある、
gulp 4.0のリリースまでの一時的な解決策であることを意図していました。
 
https://www.npmjs.com/package/run-sequence

公式サイトPlease Noteに記載がありますが、
gulp4.0ではgulp.seriesgulp.parallelという機能で同様の事ができるらしいです。

ちなみに、gulp4.0のchangelogには記載があります。

2. run-sequenceの使い方

インストール

$ npm install --save-dev run-sequence

使い方

公式からの引用です。
https://www.npmjs.com/package/run-sequence#usage

var gulp = require('gulp');
var runSequence = require('run-sequence');
var del = require('del');
var fs = require('fs');
 
// This will run in this order:
// * build-clean
// * build-scripts and build-styles in parallel
// * build-html
// * Finally call the callback function
gulp.task('build', function(callback) {
  runSequence('build-clean',
              ['build-scripts', 'build-styles'],
              'build-html',
              callback);
});
 
// configure build-clean, build-scripts, build-styles, build-html as you wish,
// but make sure they either return a stream or promise, or handle the callback
// Example:
 
gulp.task('build-clean', function() {
    // Return the Promise from del()
    return del([BUILD_DIRECTORY]);
//  ^^^^^^
//   This is the key here, to make sure asynchronous tasks are done!
});
 
gulp.task('build-scripts', function() {
    // Return the stream from gulp
    return gulp.src(SCRIPTS_SRC).pipe(...)...
//  ^^^^^^
//   This is the key here, to make sure tasks run to completion!
});
 
gulp.task('callback-example', function(callback) {
    // Use the callback in the async function
    fs.readFile('...', function(err, file) {
        console.log(file);
        callback();
//      ^^^^^^^^^^
//       This is what lets gulp know this task is complete!
    });
});

ポイント

上記のコードでいうと、ポイントは以下です。

  runSequence('build-clean',
              ['build-scripts', 'build-styles'],
              'build-html',
              callback);
  • runSequenceに記載した順に直列で実行される
  • 各タスクはreturnするか、callback()を呼び出す必要がある

3. run-sequenceのrunSequenceで直列指定の挙動を確認

まず、非同期な処理想定としてsetTimeoutを使って確認してみます。

runSequenceを使うパターンを以下のようなパターンで確認します。

  • 3.0. runSequence使った場合の期待する挙動
  • 3.1. runSequence使わなかった場合
  • 3.2. runSequencee使ったがcallback呼ばなかった場合
  • 3.3. runSequencee使ってcallbackを入れたがおしい場合
  • 3.4. runSequencee使って意図通りの指定をした場合

3.0. runSequencee使った場合の期待する挙動

まずは期待する挙動です。
以下のようにtaskを定義したとします。
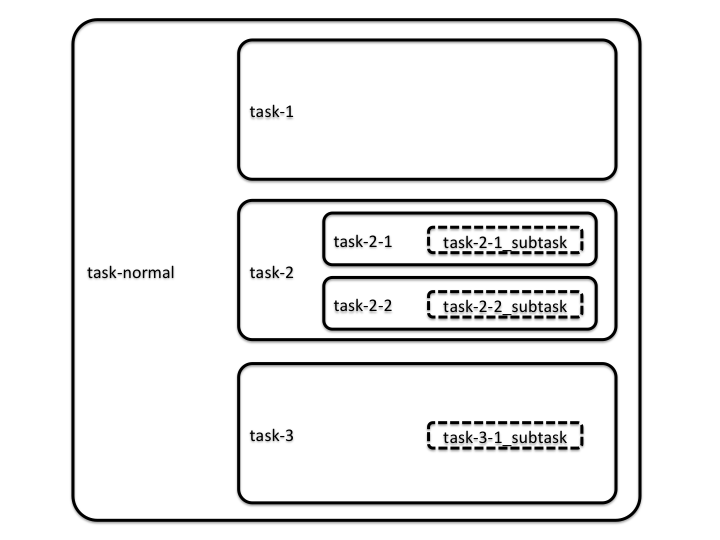
f:id:tweeeety:20180531164424p:plain

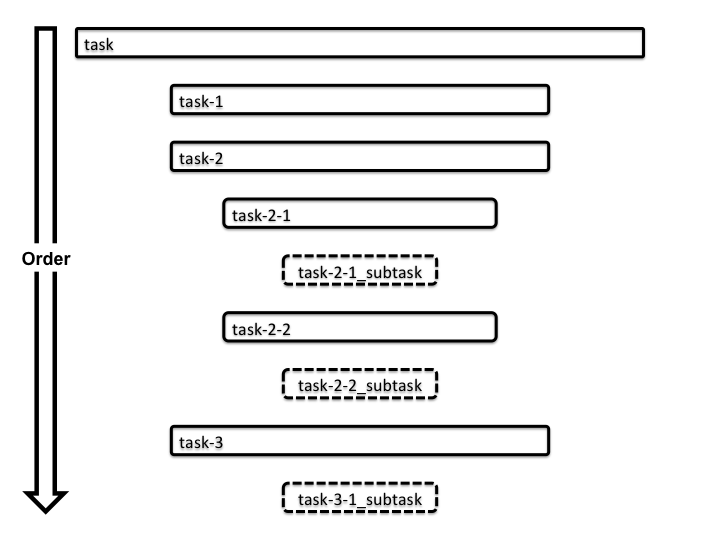
この時、呼ばれる順番を以下のように期待したという前提ですすめます。
f:id:tweeeety:20180531164445p:plain

3.1. runSequence使わなかった場合

runSequenceを使わなかった場合の挙動を確認します。

コード
var gulp = require('gulp');                                                                                                                                                                                                                                

gulp.task('task', ['task-1', 'task-2', 'task-3']);

gulp.task('task-1', function() {
  console.log('called task-1');
});

gulp.task('task-2', ['task-2-1', 'task-2-2']);

gulp.task('task-2-1', function() {
  console.log('called task-2-1');

  // 5秒間かかるタスク
  setTimeout(function(){
    console.log("\tcalled task-2-1_subtask");
  }, 5000);
});

gulp.task('task-2-2', function() {
  console.log('called task-2-2');

  // 3秒間かかるタスク
  setTimeout(function(){
    console.log("\tcalled task-2-2_subtask");
  }, 3000);
});

gulp.task('task-3', function() {
  console.log('called task-3');

  // 1秒間かかるタスク
  setTimeout(function(){
    console.log("\tcalled task-3_subtask");
  }, 1000);

});

gulp.task('default', ['task-normal']);

このコードは以下に置きました。
https://github.com/tweeeety/gulp-task-order/blob/master/task_normal/gulpfile.js

実行してみる

このまま実行すると、*_subtaskが非同期に最後にまとめて呼ばれます。

$ gulp task
[16:39:10] Using gulpfile ~/gulp-task-order/task_normal/gulpfile.js
[16:39:10] Starting 'task-1'...
called task-1
[16:39:10] Finished 'task-1' after 104 μs
[16:39:10] Starting 'task-2-1'...
called task-2-1
[16:39:10] Finished 'task-2-1' after 592 μs
[16:39:10] Starting 'task-2-2'...
called task-2-2
[16:39:10] Finished 'task-2-2' after 558 μs
[16:39:10] Starting 'task-2'...
[16:39:10] Finished 'task-2' after 2 μs
[16:39:10] Starting 'task-3'...
called task-3
[16:39:10] Finished 'task-3' after 38 μs
[16:39:10] Starting 'task'...
[16:39:10] Finished 'task' after 1.78 μs
  called task-3_subtask
  called task-2-2_subtask
  called task-2-1_subtask
結果

以下のような順で呼ばれています
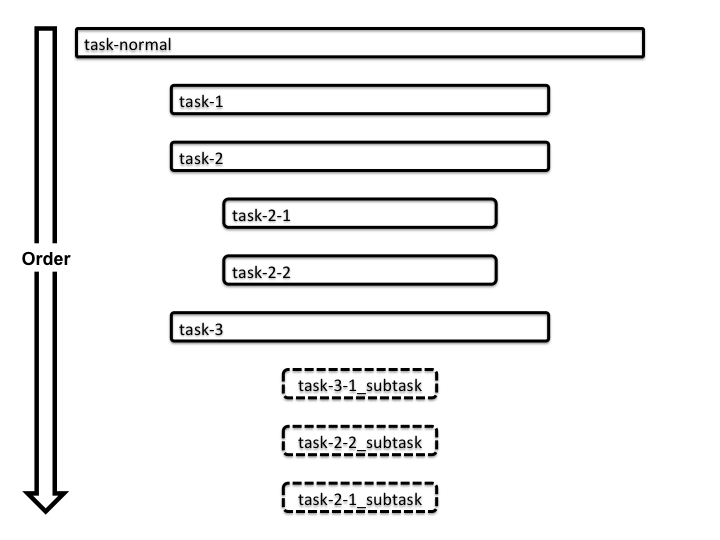
f:id:tweeeety:20180531164537p:plain

ポイント
  • *_subtaskたちが非同期にすべて最後に呼ばれている
  • 順番もtask-3-1_subtask, task-2-2_subtask, task-2-1_subtaskというように期待した逆の順に呼ばれている

3.2. runSequence使ったがcallback呼ばなかった場合

runSequenceは使ったが、callbackを呼ばなかった場合の挙動を確認します。
一番よくありがちなパターンでしょうか。

コード
var gulp = require('gulp');
var runSequence = require('run-sequence');

gulp.task('task', function(callback) {
  runSequence('task-1', 'task-2', 'task-3', callback);
});
                                                                                                                                                                                                                                                           
gulp.task('task-1', function() {
  console.log('called task-1');
});

gulp.task('task-2', ['task-2-1', 'task-2-2']);

gulp.task('task-2-1', function() {
  console.log('called task-2-1');

  // 5秒間かかるタスク
  setTimeout(function(){
    console.log("\tcalled task-2-1_subtask");
  }, 5000);
});

gulp.task('task-2-2', function() {
  console.log('called task-2-2');

  // 3秒間かかるタスク
  setTimeout(function(){
    console.log("\tcalled task-2-2_subtask");
  }, 3000);
});

gulp.task('task-3', function() {
  console.log('called task-3');

  // 1秒間かかるタスク
  setTimeout(function(){
    console.log("\tcalled task-3_subtask");
  }, 1000);

});

gulp.task('default', ['task-sync-fail-1']);

このコードは以下に置きました。
https://github.com/tweeeety/gulp-task-order/blob/master/task_sync_fail_1/gulpfile.js

実行してみる

runSequenceを使ったものの、
3.1. runSequence使わなかった場合 とまったく同じ結果で非同期なままです。

$ gulp task
[17:02:17] Using gulpfile ~/gulp-task-order/task_sync_fail_1/gulpfile.js
[17:02:17] Starting 'task'...
[17:02:17] Starting 'task-1'...
called task-1
[17:02:17] Finished 'task-1' after 102 μs
[17:02:17] Starting 'task-2-1'...
called task-2-1
[17:02:17] Finished 'task-2-1' after 967 μs
[17:02:17] Starting 'task-2-2'...
called task-2-2
[17:02:17] Finished 'task-2-2' after 901 μs
[17:02:17] Starting 'task-2'...
[17:02:17] Finished 'task-2' after 2.05 μs
[17:02:17] Starting 'task-3'...
called task-3
[17:02:17] Finished 'task-3' after 40 μs
[17:02:17] Finished 'task' after 5.69 ms
  called task-3_subtask
  called task-2-2_subtask
  called task-2-1_subtask
結果

以下のような順で呼ばれています
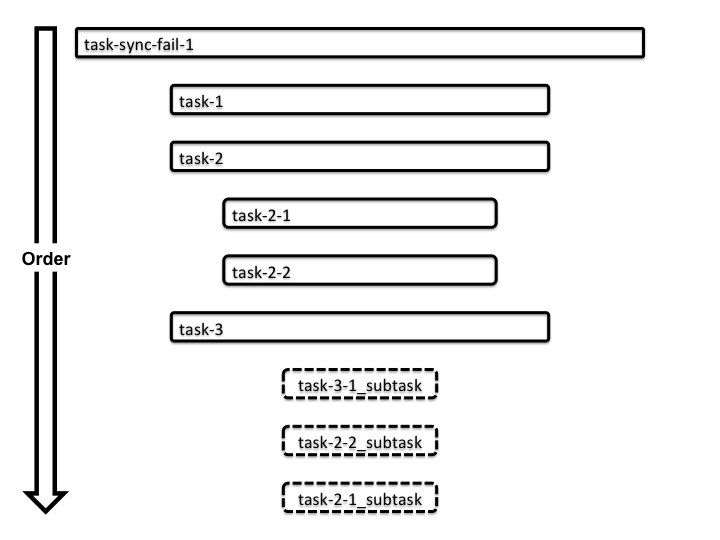
f:id:tweeeety:20180531170801p:plain

ポイント
  • 3.1. runSequence使わなかった場合 とまったく同じ

3.3. runSequencee使ってcallbackを入れたがおしい場合

runSequenceeを使ってcallbackも入れたがネストが考慮されてない場合の挙動を確認してみます。

コード
var gulp = require('gulp');
var runSequence = require('run-sequence');

gulp.task('task', function(callback) {                                                                                                                                                                                                                     
  runSequence('task-1', 'task-2', 'task-3', callback);
});

gulp.task('task-1', function() {
  console.log('called task-1');
});

gulp.task('task-2', ['task-2-1', 'task-2-2']);

gulp.task('task-2-1', function(callback) {
  console.log('called task-2-1');

  // 5秒間かかるタスク
  setTimeout(function(){
    console.log("\tcalled task-2-1_subtask");
    callback();
  }, 5000);
});

gulp.task('task-2-2', function(callback) {
  console.log('called task-2-2');

  // 3秒間かかるタスク
  setTimeout(function(){
    console.log("\tcalled task-2-2_subtask");
    callback();
  }, 3000);
});

gulp.task('task-3', function(callback) {
  console.log('called task-3');

  // 1秒間かかるタスク
  setTimeout(function(){
    console.log("\tcalled task-3_subtask");
    callback();
  }, 1000);

});

gulp.task('default', ['task-sync-fail-2']);

このコードは以下に置きました。
https://github.com/tweeeety/gulp-task-order/blob/master/task_sync_fail_2/gulpfile.js

実行してみる

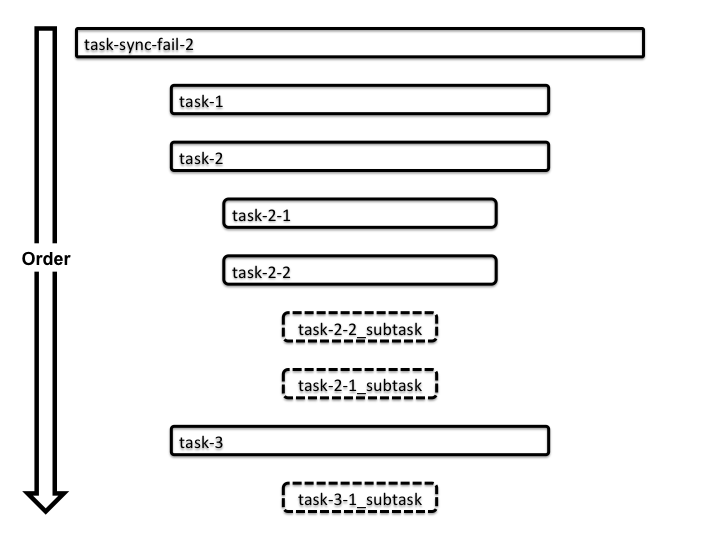
よく見ないとわかりずらいですが、
task-2-2_subtasktask-2-1_subtaksあたりが意図した通りになっていません。

$ gulp task
[17:13:16] Using gulpfile ~/gulp-task-order/task_sync_fail_2/gulpfile.js
[17:13:16] Starting 'task'...
[17:13:16] Starting 'task-1'...
called task-1
[17:13:16] Finished 'task-1' after 163 μs
[17:13:16] Starting 'task-2-1'...
called task-2-1
[17:13:16] Starting 'task-2-2'...
called task-2-2
  called task-2-2_subtask
[17:13:19] Finished 'task-2-2' after 3 s
  called task-2-1_subtask
[17:13:21] Finished 'task-2-1' after 5 s
[17:13:21] Starting 'task-2'...
[17:13:21] Finished 'task-2' after 4.19 μs
[17:13:21] Starting 'task-3'...
called task-3
  called task-3_subtask
[17:13:22] Finished 'task-3' after 1 s
[17:13:22] Finished 'task' after 6.01 s
結果

以下のような順で呼ばれています
f:id:tweeeety:20180531172026p:plain

ポイント
  • task2とtask3の*_subtaskは、それぞれの中で呼ばれるようになった
  • ただし、task2内のtask-2-2_subtask、task-2-1_subtaksの順番は非同期のまま

3.4. runSequencee使って意図通りの指定をした場合

最後に意図通りの使い方の確認です。

コード
var gulp = require('gulp');
var runSequence = require('run-sequence');

gulp.task('task', function(callback) {
  runSequence('task-1', 'task-2', 'task-3', callback);
});

gulp.task('task-1', function() {
  console.log('called task-1');
});

gulp.task('task-2', function(callback){                                                                                                                                                                                                                    
  runSequence('task-2-1', 'task-2-2', callback);
});

gulp.task('task-2-1', function(callback) {
  console.log('called task-2-1');

  // 5秒間かかるタスク
  setTimeout(function(){
    console.log("\tcalled task-2-1_subtask");
    callback();
  }, 5000);
});

gulp.task('task-2-2', function(callback) {
  console.log('called task-2-2');

  // 3秒間かかるタスク
  setTimeout(function(){
    console.log("\tcalled task-2-2_subtask");
    callback();
  }, 3000);
});

gulp.task('task-3', function(callback) {
  console.log('called task-3');

  // 1秒間かかるタスク
  setTimeout(function(){
    console.log("\tcalled task-3_subtask");
    callback();
  }, 1000);

});

gulp.task('default', ['task-sync']);

このコードは以下に置きました。
https://github.com/tweeeety/gulp-task-order/blob/master/task_sync/gulpfile.js

実行してみる

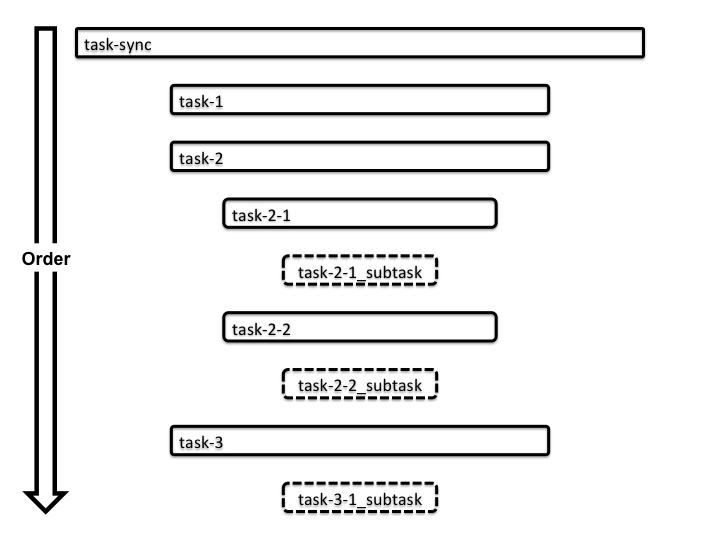
意図どおりになりました!

$ gulp task
[17:21:37] Using gulpfile ~/gulp-task-order/task_sync/gulpfile.js
[17:21:37] Starting 'task'...
[17:21:37] Starting 'task-1'...
called task-1
[17:21:37] Finished 'task-1' after 102 μs
[17:21:37] Starting 'task-2'...
[17:21:37] Starting 'task-2-1'...
called task-2-1
  called task-2-1_subtask
[17:21:42] Finished 'task-2-1' after 5 s
[17:21:42] Starting 'task-2-2'...
called task-2-2
  called task-2-2_subtask
[17:21:45] Finished 'task-2-2' after 3 s
[17:21:45] Finished 'task-2' after 8.01 s
[17:21:45] Starting 'task-3'...
called task-3
  called task-3_subtask
[17:21:46] Finished 'task-3' after 1 s
[17:21:46] Finished 'task' after 9.01 s
結果

無事意図通りに呼ばれるようになりました。 f:id:tweeeety:20180531172423p:plain
サンプル

一応サンプルをおいておきました。
npm installすればそれぞれ試せます。

参考

おわり

使い方や説明を見てわかることもありますが、
実際に確認するのって大切ですよね\(^o^)/

【gulp】gulpのtaskを任意のタイミングで中断(kill)する - process.exit

はじめに

さまざまな時にgulpのタスクを終了させたい事があります。
そんなときのメモ

process.exitを使う

process.exitを使う事でgulp taskを中断できます

たとえば以下のように使います。

  • gulpfile.js
var gulp = require('gulp');

gulp.task('task', ['task1', 'task2', 'task-kill', 'task3']);

gulp.task('task1', function() {
  console.log('i am task1!!');
});

gulp.task('task2', function() {
  console.log('i am task2!!');
});

gulp.task('task-kill', function() {
  console.log("before kill task");

  process.exit(0);

  console.log("after kill task");                                                                                                                                                                                                                                          
});

gulp.task('task3', function() {
  console.log('i am task3!!');
});
  • 出力
$ gulp task
[16:42:45] Using gulpfile ~/gulp-task-kill/gulpfile.js
[16:42:45] Starting 'task1'...
i am task1!!
[16:42:45] Finished 'task1' after 147 μs
[16:42:45] Starting 'task2'...
i am task2!!
[16:42:45] Finished 'task2' after 56 μs
[16:42:45] Starting 'task-kill'...
before kill task

サンプル

https://github.com/tweeeety/gulp-task-kill

おわり

正常終了じゃないときは、exitに1を指定しましょう!\(^o^)/

【gulp】gulp taskをファイルに分割 - require-dir

はじめに

gulpは長い事つかってますが、 フロントの方が入れてくれた環境を基に使っているのでゼロから学んだ経験は乏しいです。 (自分はサーバサイド)

改めてゼロから設定していると、
gulpfile.jsのtaskが肥大化してわかりにくくなるのでファイルを分けたくなる事があります。

そんなときの自分メモ

f:id:tweeeety:20180524215025p:plain

アジェンダ

  1. ファイルに分けるには
  2. requireDirインストール
  3. requireDir使ってみる

1. ファイルに分けるには

requireDirというNode helperを使います。
https://www.npmjs.com/package/require-dir

2. requireDirインストール

# サラからならgulpも
$ npm install --save-dev gulp

# require-dirインストール
$ npm install --save-dev require-dir

3. requireDir使ってみる

構成

例ですが、以下のようなtasksディレクトリ以下に分割したtaskをおきます

$ tree
.
├── gulpfile.js
├── package.json
└── tasks
    ├── task1.js
    ├── task2.js.bk
    └── task3.js
gulpfile.js

gulpfile.jsの中身は以下のように書くだけです。

var dir = require( 'require-dir' );
dir( './tasks', { recurse: true } );

tasksディレクトリ配下に書いたtaskを実行してくれます

実行
$ gulp task1
[15:42:30] Using gulpfile ~/gulp-task-divide/gulpfile.js
[15:42:30] Starting 'task1'...
i am task1!!
[15:42:30] Finished 'task1' after 129 μs

$ gulp task2
[15:42:32] Using gulpfile ~/gulp-task-divide/gulpfile.js
[15:42:32] Starting 'task2'...
i am task2!!
[15:42:32] Finished 'task2' after 135 μs

$ gulp task3
[15:42:34] Using gulpfile ~/gulp-task-divide/gulpfile.js
[15:42:34] Starting 'task3'...
i am task3!!
[15:42:34] Finished 'task3' after 120 μs

サンプル

github.com

おわり

require-dirですっきり\(^o^)/

【git】.gitignoreで反映されないとき - git rm --cached

はじめに

.gitignoreの反映方法をいつも忘れるので自分用メモ
本当に毎回忘れる...

f:id:tweeeety:20180529162907p:plain

git rm --cachedでキャッシュを消す

# .gitignore編集
$ vi .gitignore
---- vi ----
sample.txt
------------

# キャッシュを消す
$ git rm --cached sample.txt

# pushする
$ git add .gitignore
$ git commit -m 'add .gitignore'
$ git push origin master

おわり

これ本当に毎回忘れるーーーーーーー\(^o^)/
覚えておく必要もないけど...

【gulp】サクっと3stepで覚えるgulpとは〜簡単な使い方

はじめに

gulpは長い事つかってますが、
フロントの方が入れてくれた環境を基に使っているのでゼロから学んだ経験は乏しいです。
(自分はサーバサイド)

そこでgulpの基礎をゼロからなるはやで覚えるための自分用メモです

f:id:tweeeety:20180524215025p:plain

アジェンダ

  1. gulpとは
  2. gulp環境つくる
  3. gulp使ってみる

1. gulpとは

公式リポジトリは以下です。
https://github.com/gulpjs/gulp

参考サイトからの抜粋です。

gulpはNode.jsをベースとしたビルドシステムヘルパーです。
gulpの一番の特徴はサイトのトップページで「ストリーミングビルドシステム」と自ら名乗っているように、
ファイルの処理をストリームで行うというところです。
この特徴によって複雑なタスクも細かくカスタマイズして書くことができます。
  現場で使えるgulp入門 第1回 gulpとは何か

2. gulp環境つくる

gulp環境を作るにはシンプルに以下の3つが必要です

  • Node.jsのインストールする
    • nodeコマンドとnpmコマンドを使えるようにする
  • npmでgulpをインストールする
    • gulpコマンド使えるようにする
    • package.json作る
  • タスクを書く
    • gulpfile.js作る

Node.jsのインストールする

公式サイトからダウンロードしてinstallします。
https://nodejs.org/

f:id:tweeeety:20180524215044p:plain

とりあえず動かしてみるにしてもLTSの方を落としてみると良いでしょう。

npmでgulpをインストールする

gulpはglobalとlocalとにインストールします。
また、パッケージ管理のためにpackage.jsonを作成します。

# パッケージディレクトリに移動
$ pwd
/path/to/package dir

# package.jsonを作成
# {} だけ記載
$ vim package.json
---- vi ----
{}
------------

# gulpをグローバルにインストール
$ npm install -g gulp

# gulpをパッケージローカルにインストール
#   このタイミングでpackage.jsonに
#   インストールしたものとversionが書かれる
$ npm install --save-dev gulp

# versionが出れば成功
$ gulp -v
[19:53:54] CLI version 3.9.1
[19:53:54] Local version 3.9.1

$ cat package.json
{
  "devDependencies": {
    "gulp": "^3.9.1"
  }
}

3. gulp使ってみる

gulpタスクの作成

使ってみるといってもまずはgulpタスクを作成する必要があります。
タスクはgulpfile.jsに記載します。

  • gulpfile.js
var gulp = require('gulp');

gulp.task('hello', function() {
  console.log('say Hello!');
});

gulp.task('world', function() {
  console.log('say World!');
});

gulp.task('default', ['hello', 'world']);    

gulpタスクの実行

あとは実行するだけです

# helloタスクを実行してみる
$ gulp hello
[19:58:33] Using gulpfile ~/github/my/for_hatena/gulp-basic-sample/gulpfile.js
[19:58:33] Starting 'hello'...
say Hello!
[19:58:33] Finished 'hello' after 144 μs


# gulpとだけうってdefaultタスクを実行
# default task = hello + worldが呼ばれる
$ gulp
[19:58:48] Using gulpfile ~/github/my/for_hatena/gulp-basic-sample/gulpfile.js
[19:58:48] Starting 'hello'...
say Hello!
[19:58:48] Finished 'hello' after 145 μs
[19:58:48] Starting 'world'...
say World!
[19:58:48] Finished 'world' after 54 μs
[19:58:48] Starting 'default'...
[19:58:48] Finished 'default' after 9.73 μs

いちおうサンプル

作ったサンプルをそのままpushしたので貼っておきます。

おわり

これだけだとまだ何もできないですが、
導入して動かしてみるだけで雰囲気はわかるかと思います\(^o^)/

【git】git mergeでCONFLICTした場合のmerge取り消し - "git merge --abort"

はじめに

gitを使っていればCONFLICTはちょくちょくありますよね。

# 最初は差分がないことを確認
$ git status
On branch [ブランチ1]
nothing to commit, working directory clean

# とあるブランチをmerge
# するとCONFLICT...
$ git merge [ブランチ2]
Auto-merging package.json
CONFLICT (content): Merge conflict in package.json
Automatic merge failed; fix conflicts and then commit the result.

そんな時に通常はCONFLICTを解消しますが、
そうではなく一回なかったことにしたいこともあるわけです。
あるんですよ...

そんな場合の対処法

そこで"git merge --abort"

git merge --abortを使うとマージする前の状態に戻ります。

いちおうCONFLICTしてから取り消す一連を参考程度に。

# 最初は差分がないことを確認
$ git status
On branch [ブランチ1]
nothing to commit, working directory clean

# とあるブランチをmerge
$ git merge [ブランチ2]
Auto-merging package.json
CONFLICT (content): Merge conflict in package.json
Automatic merge failed; fix conflicts and then commit the result.

# statusを見るとCONFLICTしている
$ git status
On branch [ブランチ1]
You have unmerged paths.
  (fix conflicts and run "git commit")

Changes to be committed:

  modified:   README.md

Unmerged paths:
  (use "git add <file>..." to mark resolution)

  both modified:   package.json

# CONFLICTじゃなければ戻せるcheckoutを試しに
# 当然断られる
$ git checkout .
error: path 'package.json' is unmerged

# ここで登場
$ git merge --abort

# 無事になかったことに
$ git status
On branch [ブランチ1]
nothing to commit, working directory clean

おわり

mergeやめたい!って場合がたまーにあるたびに調べてたので自分用備忘録でした\(^o^)/

【Node.js】Node.jsのLTSやCURRENTってなんだ?

はじめに

Node.jsを改めてインストールするときに
LTSとCURRENTがありますが、それぞれなんだっけ?を忘れるので自分用メモです。

公式サイトより

https://github.com/nodejs/Release からの抜粋です

Mandate
 
The Release working group's purpose is:
 
* Management/execution of the release and support process for all releases.
 
Its responsibilities are:
 
* Define the release process.
* Define the content of releases.
* Generate and create releases.
* Test Releases
* Manage the LTS and Current branches including backporting changes to these branches.
* Define the policy for what gets backported to release streams.
 
The Release working group is structured into teams and membership in the working group does not automatically result in membership in these teams. These teams are:
 
* Releasers team
* LTS team
* CITGM team
 
The releasers team is entrusted with the secrets and CI access to be able build and sign releases. Additions to the releasers team must be approved by the TSC following the process outlined in GOVERNANCE.md.
 
The Long Term Support (LTS) team manages the process/content of LTS releases and the required backporting for these releases. Additions to the LTS team needs sign off from the rest of the LTS team.
 
The Canary in the Gold Mine (CITGM) team maintains CITGM as one of the key sanity checks for releases. This team maintains the CITGM repository and works to keep CITGM builds running and passing regularly. This also includes maintaining the CI jobs in collaboration with the Build Working Group.

関係ありそうなところだけ抜粋すると

  • リリースワーキンググループがある
  • リリースにおける管理と実行を行う
  • グループは3つのチーム構成で構成されている
    • Releasers team
    • LTS team
    • CITGM team

これを踏まえて

LTSとCURRENTってなに?

LTSとは

LTSは、Long-term Supportの略で、長期の保守運用が約束されたバージョンです

CURRENTとは

CURRENTは、最新版だけど安定性を約束しないことで機能追加を盛り込んだバージョンです

参考

おわり

ある程度安定したサービスを作る目的ならLTS、
いろいろ試してみたいときはCURRENTですかね\(^o^)/